MyDB TM - 事务管理 tm 模块通过维护一个 xid 文件来进行事务管理
1 2 3 4 5 6 7 8 9 10 11 12 13 14 15 static final int LEN_XID_HEADER_LENGTH = 8 ;private static final int XID_FIELD_SIZE = 1 ;private static final byte FIELD_TRAN_ACTIVE = 0 ;private static final byte FIELD_TRAN_COMMITTED = 1 ;private static final byte FIELD_TRAN_ABORTED = 2 ;public static final long SUPER_XID = 0 ;
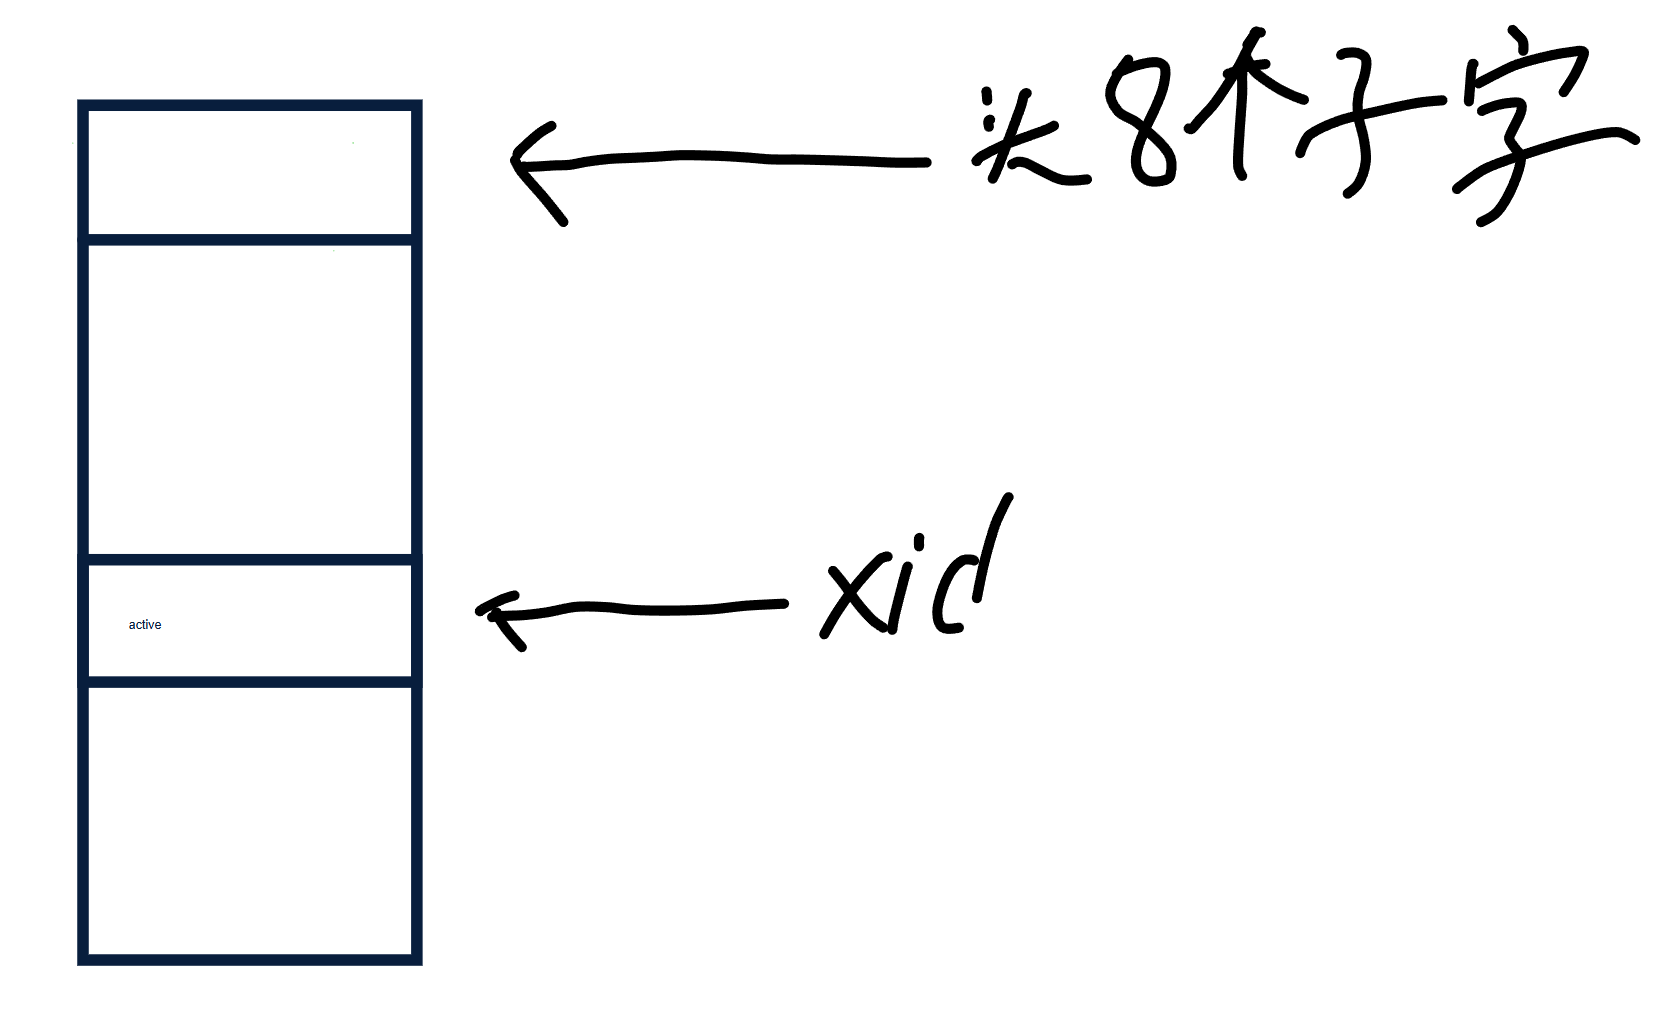
xid 文件头八个字节是保存最新创建的事务的 id 为 xidCounter ,通过 RandomAccessFile ,FileChannel 类来操作文件。
1 2 3 4 5 6 private RandomAccessFile file;private FileChannel fc;private long xidCounter;
将 事务文件 类比成 数组 的话,事务的 id 相当于下标,下标对应的值就是事务的状态例如:活跃、提交、撤销 ,每个事务在事务文件中占据一个字节。
初始化 在与事务文件连接后,会检测事务文件是否合法,先通过 fc 获取 xid 文件的实际大小为 fileLen,然后通过头字节获得当前的事务 id,然后算出这个 id 在 xid 文件的位置为 end,如果 fileLen != end,说明 xid 文件异常,直接退出系统
创建事务 1 2 3 4 5 6 7 8 9 10 11 public long begin () { counterLock.lock(); try { long xid = this .xidCounter + 1 ; this .updateXID(xid, FIELD_TRAN_ACTIVE); this .incrXIDCounter(); return xid; } finally { counterLock.unlock(); } }
先创建事务 id 然后根据事务 id,在事务文件中找到对应的位置写入活跃状态
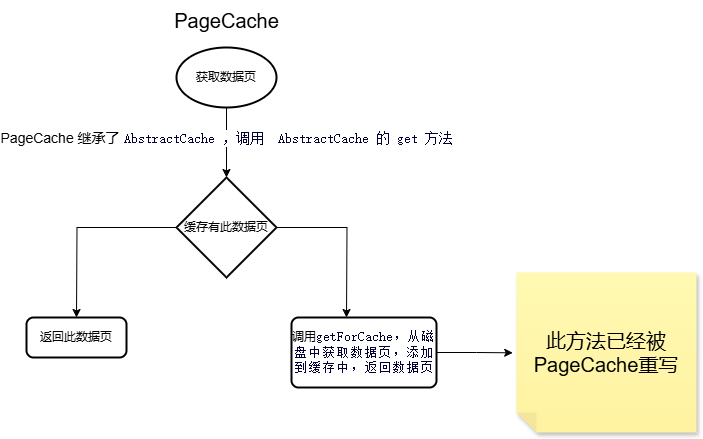
DM - 数据页的缓存与管理 引用计数缓存框架 此框架的作用是向上提供缓存,向下读取文件,使用引用计数的方式来处理缓存,当从缓存读取一个数据,对应的计数加一,当上层应用不在使用该缓存时,对应的计数减一,当计数为零时,会写回文件
1 2 3 4 5 6 7 8 9 10 11 12 private HashMap<Long, T> cache;private HashMap<Long, Integer> references;private HashMap<Long, Boolean> getting;private int maxResource;private int count = 0 ;private Lock lock;
两个抽象方法,留给实现类去实现具体
1 2 3 4 5 6 7 8 9 protected abstract T getForCache (long key) throws Exception;protected abstract void releaseForCache (T obj) ;
获取数据的方法
1 2 3 4 5 6 7 8 9 10 11 12 13 14 15 16 17 18 19 20 21 22 23 24 25 26 27 28 29 30 31 32 33 34 35 36 37 38 39 40 41 42 43 44 45 46 47 48 49 50 51 52 53 protected T get (long key) throws Exception { while (true ) { lock.lock(); if (getting.containsKey(key)) { lock.unlock(); try { Thread.sleep(1 ); } catch (InterruptedException e) { log.error(e.getMessage()); continue ; } continue ; } if (cache.containsKey(key)) { T obj = cache.get(key); references.put(key, references.getOrDefault(key, 0 ) + 1 ); lock.unlock(); return obj; } if (maxResource > 0 && count >= maxResource) { lock.unlock(); throw Error.CacheFullException; } count++; getting.put(key, true ); lock.unlock(); break ; } T obj; try { obj = this .getForCache(key); } catch (Exception e) { lock.lock(); count --; getting.remove(key); lock.unlock(); throw e; } lock.lock(); cache.put(key, obj); getting.remove(key); references.put(key, references.getOrDefault(key, 0 ) + 1 ); lock.unlock(); return obj; }
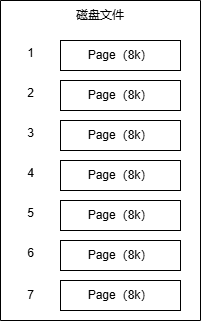
数据页的缓存与管理 Page - 数据页 1 2 3 4 5 6 7 8 9 10 11 12 13 14 void lock () ;void unlock () ;void release () ;void setDirty (boolean dirty) ;boolean isDirty () ;int getPageNumber () ;byte [] getData();
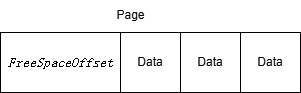
PageX - 管理普通页 PageX 类主要用于管理普通页,它定义了普通页的结构并提供了操作普通页的方法。普通页的结构包含一个 FreeSpaceOffset(空闲空间偏移量)和实际的数据部分。下面详细讲解 PageX 类的各个部分:
类的定义和常量
1 2 3 4 5 public class PageX { private static final short OF_FREE = 0 ; private static final short OF_DATA = 2 ; public static final int MAX_FREE_SPACE = PageCache.PAGE_SIZE - OF_DATA;
OF_FREE:表示空闲空间偏移量的起始位置,值为 0。OF_DATA:表示数据部分的起始位置,值为 2。因为空闲空间偏移量占 2 个字节。MAX_FREE_SPACE:表示页面的最大空闲空间大小,等于页面总大小减去空闲空间偏移量所占的 2 个字节。
初始化页面
1 2 3 4 5 6 7 8 9 public static byte [] initRaw() { byte [] raw = new byte [PageCache.PAGE_SIZE]; setFSO(raw, OF_DATA); return raw; } private static void setFSO (byte [] raw, short ofData) { System.arraycopy(Parser.short2Byte(ofData), 0 , raw, OF_FREE, OF_DATA); }
initRaw() 方法:用于初始化一个新的页面。创建一个大小为 PageCache.PAGE_SIZE 的字节数组,并调用 setFSO 方法将空闲空间偏移量设置为 OF_DATA。setFSO(byte[] raw, short ofData) 方法:将 ofData 转换为 2 字节的数组,并复制到 raw 数组的 OF_FREE 位置,用于设置空闲空间偏移量。
获取空闲空间偏移量
1 2 3 4 5 6 7 8 public static short getFSO (Page pg) { return getFSO(pg.getData()); } private static short getFSO (byte [] raw) { return Parser.parseShort(Arrays.copyOfRange(raw, 0 , 2 )); }
getFSO(Page pg) 方法:通过 Page 对象获取其数据,并调用另一个 getFSO 方法获取空闲空间偏移量。getFSO(byte[] raw) 方法:从 raw 数组的前 2 个字节解析出空闲空间偏移量。
插入数据到页面
1 2 3 4 5 6 7 8 public static short insert (Page pg, byte [] raw) { pg.setDirty(true ); short offset = getFSO(pg.getData()); System.arraycopy(raw, 0 , pg.getData(), offset, raw.length); setFSO(pg.getData(), (short )(offset + raw.length)); return offset; }
insert(Page pg, byte[] raw) 方法:将 raw 数据插入到 pg 页面中。首先将页面标记为脏页,然后获取当前的空闲空间偏移量作为插入位置,将 raw 数据复制到该位置,最后更新空闲空间偏移量为插入位置加上 raw 数据的长度。返回插入位置。
获取页面的空闲空间大小
1 2 3 4 public static int getFreeSpace (Page pg) { return PageCache.PAGE_SIZE - (int )getFSO(pg.getData()); }
getFreeSpace(Page pg) 方法:通过页面的总大小减去当前的空闲空间偏移量,得到页面的空闲空间大小。
恢复插入和更新操作
1 2 3 4 5 6 7 8 9 10 11 12 13 14 15 16 public static void recoverInsert (Page pg, byte [] raw, short offset) { pg.setDirty(true ); System.arraycopy(raw, 0 , pg.getData(), offset, raw.length); short rawFSO = getFSO(pg.getData()); if (rawFSO < offset + raw.length) { setFSO(pg.getData(), (short )(offset+raw.length)); } } public static void recoverUpdate (Page pg, byte [] raw, short offset) { pg.setDirty(true ); System.arraycopy(raw, 0 , pg.getData(), offset, raw.length); }
recoverInsert(Page pg, byte[] raw, short offset) 方法:用于恢复插入操作。将 raw 数据插入到 pg 页面的 offset 位置,并将页面标记为脏页。如果当前的空闲空间偏移量小于插入位置加上 raw 数据的长度,则更新空闲空间偏移量。recoverUpdate(Page pg, byte[] raw, short offset) 方法:用于恢复更新操作。将 raw 数据插入到 pg 页面的 offset 位置,并将页面标记为脏页,不更新空闲空间偏移量。
PageCache - 数据页管理
日志文件 1 2 3 4 5 6 7 8 9 10 void log (byte [] data) ;void truncate (long x) throws Exception;byte [] next();void rewind () ;void close () ;
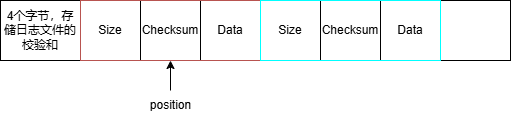
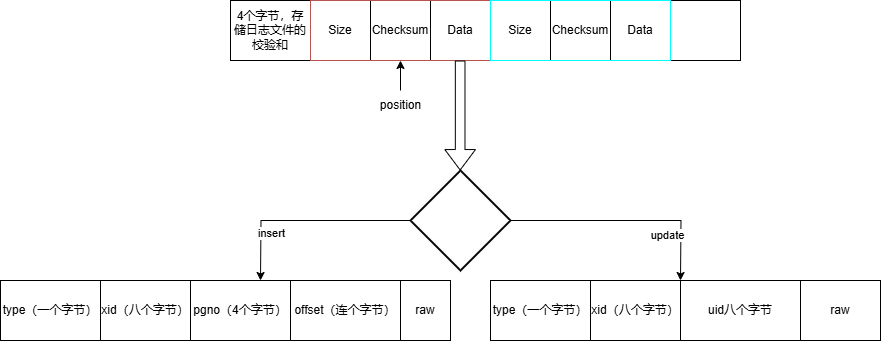
在一个日志文件中,文件开头的4个字节用于存放日志文件的校验和 xChecksum , 从第四个字节以后存入日志。
Size :共4个字节,包含 Size、Checksum、Data
Checksum:该条日志的校验和,用于判断该日志是否合法
Data:该条日志的真正内容
恢复策略 DM 为上层模块,提供了两种操作,分别是插入新数据(I)和更新现有数据(U)。至于为啥没有删除数据,这个会在 VM 一节叙述。
DM 的日志策略很简单,一句话就是:
在进行 I 和 U 操作之前,必须先进行对应的日志操作,在保证日志写入磁盘后,才进行数据操作。
这个日志策略,使得 DM 对于数据操作的磁盘同步,可以更加随意。日志在数据操作之前,保证到达了磁盘,那么即使该数据操作最后没有来得及同步到磁盘,数据库就发生了崩溃,后续也可以通过磁盘上的日志恢复该数据。
(Ti, I, A, x),表示事务 Ti 在 A 位置插入了一条数据 x
(Ti, U, A, oldx, newx),表示事务 Ti 将 A 位置的数据,从 oldx 更新成 newx
在此数据库中,一个事务不会 读取 和 修改 另一个事务正在操作的数据,也就是说当根据日志恢复数据时,只需要判断该事务是否提交,如果提交了,则会进行重做,如果没有提交,则会进行逻辑删除
1 2 3 4 5 6 7 8 9 10 11 12 13 14 15 16 17 18 19 20 21 22 23 private static final byte LOG_TYPE_INSERT = 0 ; private static final byte LOG_TYPE_UPDATE = 1 ; private static final int REDO = 0 ; private static final int UNDO = 1 ; static class InsertLogInfo { long xid; int pgno; short offset; byte [] raw; } static class UpdateLogInfo { long xid; int pgno; short offset; byte [] oldRaw; byte [] newRaw; }
页面索引 PageInfo - 数据页的页号与空闲空间 1 2 3 4 5 6 7 8 9 public class PageInfo { public int pgno; public int freeSpace; public PageInfo (int pgno, int freeSpace) { this .pgno = pgno; this .freeSpace = freeSpace; } }
PageIndex - 管理所有PageInfo 1 2 3 4 5 6 7 8 9 10 11 12 13 14 15 private static final int INTERVALS_NO = 40 ;private static final int THRESHOLD = PageCache.PAGE_SIZE / INTERVALS_NO;private Lock lock;private List<PageInfo>[] lists;@SuppressWarnings("unchecked") public PageIndex () { lock = new ReentrantLock (); lists = new List [INTERVALS_NO + 1 ]; for (int i = 0 ; i < INTERVALS_NO + 1 ; i++) { lists[i] = new ArrayList <>(); } }
空间的单位大小为 ==THRESHOLD = PageCache.PAGE_SIZE / INTERVALS_NO==list[20] 找一个数据页
1 2 3 4 5 6 7 8 9 10 11 12 public PageInfo select (int spaceSize) { int number = spaceSize / THRESHOLD; if (number < INTERVALS_NO) number ++; while (number <= INTERVALS_NO) { if (lists[number].size() == 0 ) { number ++; continue ; } return lists[number].remove(0 ); } return null ; }
可以注意到,被选择的页,会直接从 PageIndex 中移除,这意味着,同一个页面是不允许并发写的。在上层模块使用完这个页面后,需要将其重新插入 PageIndex,且不移除,也会有数据溢出的 bug
DM实现 DataItem - 数据项,DM 层向上层提供的数据抽象 1 2 3 4 5 6 7 8 9 10 11 12 13 14 static final int OF_VALID = 0 ; static final int OF_SIZE = 1 ; static final int OF_DATA = 3 ; private SubArray raw; private byte [] oldRaw; private Lock rLock; private Lock wLock; private DataManagerImpl dm; private long uid; private Page pg;
可以标识某个数据页的某个数据uid 是数据项的唯一标识
1 2 3 4 5 6 public static long addressToUid (int pgno, short offset) { long u0 = (long )pgno; long u1 = (long )offset; return u0 << 32 | u1; }
上层模块在获取到 DataItem 后,可以通过 data() 方法,该方法返回的数组是数据共享的,而不是拷贝实现的,所以使用了 SubArray。
1 2 3 4 @Override public SubArray data () { return new SubArray (raw.raw, raw.start+OF_DATA, raw.end); }
在上层模块试图对 DataItem 进行修改时,需要遵循一定的流程:在修改之前需要调用 before() 方法,想要撤销修改时,调用 unBefore() 方法,在修改完成后,调用 after() 方法。整个流程,主要是为了保存前相数据,并及时落日志。DM 会保证对 DataItem 的修改是原子性的。
1 2 3 4 5 6 7 8 9 10 11 12 13 14 15 16 17 18 @Override public void before () { wLock.lock(); pg.setDirty(true ); System.arraycopy(raw.raw, raw.start, oldRaw, 0 , oldRaw.length); } @Override public void unBefore () { System.arraycopy(oldRaw, 0 , raw.raw, raw.start, oldRaw.length); wLock.unlock(); } @Override public void after (long xid) { dm.logDataItem(xid, this ); wLock.unlock(); }
after() 方法,主要就是调用 dm 中的一个方法,对修改操作落日志,不赘述。
在使用完 DataItem 后,也应当及时调用 release() 方法,释放掉 DataItem 的缓存(由 DM 缓存 DataItem)。
1 2 3 4 @Override public void release () { dm.releaseDataItem(this ); }
PageOne - 管理第一页 ValidCheck 特殊管理第一页 ValidCheck,db启动时给100~107字节处填入一个随机字节,db关闭时将其拷贝到108~115字节,用于判断上一次数据库是否正常关闭
DataManager - 对外提供方法与 DataItem 缓存 DataManagerImpl 类是 DataManager 接口的具体实现,主要负责数据库数据的管理,包括数据的读取、插入、关闭操作,以及日志记录和页面索引的管理等功能。
1 2 3 4 5 DataItem read (long uid) throws Exception; long insert (long xid, byte [] data) throws Exception; void close () ;
插入方法 :
1 2 3 4 5 6 7 8 9 10 11 12 13 14 15 16 17 18 19 20 21 22 23 24 25 26 27 28 29 30 31 32 33 34 35 36 37 38 39 40 41 @Override public long insert (long xid, byte [] data) throws Exception { byte [] raw = DataItem.wrapDataItemRaw(data); if (raw.length > PageX.MAX_FREE_SPACE) { throw Error.DataTooLargeException; } PageInfo pi = null ; for (int i = 0 ; i < 5 ; i ++) { pi = pIndex.select(raw.length); if (pi != null ) { break ; } else { int newPgno = pc.newPage(PageX.initRaw()); pIndex.add(newPgno, PageX.MAX_FREE_SPACE); } } if (pi == null ) { throw Error.DatabaseBusyException; } Page pg = null ; int freeSpace = 0 ; try { pg = pc.getPage(pi.pgno); byte [] log = Recover.insertLog(xid, pg, raw); logger.log(log); short offset = PageX.insert(pg, raw); pg.release(); return Types.addressToUid(pi.pgno, offset); } finally { if (pg != null ) { pIndex.add(pi.pgno, PageX.getFreeSpace(pg)); } else { pIndex.add(pi.pgno, freeSpace); } } }
将待插入的数据包装成 DataItem 的原始数据。
检查数据长度是否超过页面的最大空闲空间,如果超过则抛出异常。
尝试从页面索引中选择一个有足够空闲空间的页面,如果没有则创建新页面。
如果尝试 5 次后仍未找到合适的页面,则抛出数据库繁忙异常。
获取选中的页面,生成插入日志并记录,然后将数据插入页面。
释放页面,并返回插入数据的唯一标识符(uid)。
最后更新页面索引中该页面的空闲空间信息。
到目前为止,已经有两个缓存,一个是 Page , 一个是 DataItem
1 2 3 4 5 6 7 8 @Override protected DataItem getForCache (long uid) throws Exception { short offset = (short )(uid & ((1L << 16 ) - 1 )); uid >>>= 32 ; int pgno = (int )(uid & ((1L << 32 ) - 1 )); Page pg = pc.getPage(pgno); return DataItem.parseDataItem(pg, offset, this ); }
当释放一个 DateItem 引用时,会将对应的 references 减一,如果 references 为零, 则会清除该缓存,对应的 page 引用也减一,如果此时 page 的引用也为零,就会将该 page 写回磁盘中
VM - 事务和数据版本的管理 记录的版本与事务隔离 Entry - 记录 DM 层向上层提供了数据项(Data Item)的概念,VM 通过管理所有的数据项,向上层提供了记录(Entry)的概念。上层模块通过 VM 操作数据的最小单位,就是记录。VM 则在其内部,为每个记录,维护了多个版本(Version)。每当上层模块对某个记录进行修改时,VM 就会为这个记录创建一个新的版本。
1 2 3 4 5 6 7 8 9 10 11 12 13 14 15 16 17 18 19 20 21 private static final int OF_XMIN = 0 ;private static final int OF_XMAX = OF_XMIN+8 ;private static final int OF_DATA = OF_XMAX+8 ;private long uid;private DataItem dataItem;private VersionManager vm;public static Entry newEntry (VersionManager vm, DataItem dataItem, long uid) { if (dataItem == null ) { return null ; } Entry entry = new Entry (); entry.uid = uid; entry.dataItem = dataItem; entry.vm = vm; return entry; }
Transaction - 快照 为了实现可重复读,那么在开启事务时,要记录有那些事务是对当前事务不可见的
1 2 3 4 5 6 7 8 9 10 11 12 13 14 15 16 17 18 19 20 public long xid; public int level; public Map<Long, Boolean> snapshot; public Exception err; public boolean autoAborted; public static Transaction newTransaction (long xid, int level, Map<Long, Transaction> active) { Transaction t = new Transaction (); t.xid = xid; t.level = level; if (level != 0 ) { t.snapshot = new HashMap <>(); for (Long x : active.keySet()) { t.snapshot.put(x, true ); } } return t; }
死锁检测与 VM 的实现 LockTable - 依赖等待图 1 2 3 4 5 6 7 8 9 10 private Map<Long, List<Long>> x2u;private Map<Long, Long> u2x;private Map<Long, List<Long>> wait;private Map<Long, Lock> waitLock;private Map<Long, Long> waitU;
死锁检测
1 2 3 4 5 6 7 8 9 10 11 12 13 14 15 16 17 18 19 20 21 22 23 24 25 26 27 28 29 30 31 32 33 34 35 36 37 private Map<Long, Integer> xidStamp;private int stamp;private boolean hasDeadLock () { xidStamp = new HashMap <>(); stamp = 1 ; for (long xid : x2u.keySet()) { Integer s = xidStamp.get(xid); if (s != null && s > 0 ) { continue ; } stamp ++; if (dfs(xid)) { return true ; } } return false ; } private boolean dfs (long xid) { Integer stp = xidStamp.get(xid); if (stp != null && stp == stamp) { return true ; } if (stp != null && stp < stamp) { return false ; } xidStamp.put(xid, stp); Long uid = waitU.get(xid); if (uid == null ) { return false ; } Long x = u2x.get(uid); assert x != null ; return dfs(x); }
VersionManager - VM实现 1 2 3 4 5 6 7 byte [] read(long xid, long uid) throws Exception; long insert (long xid, byte [] data) throws Exception; boolean delete (long xid, long uid) throws Exception; long begin (int level) ; void commit (long xid) throws Exception; void abort (long xid) ;
VersionManager 也继承了 AbstractCache 实现了 Entry 的缓存
1 2 3 4 5 6 7 8 9 10 11 12 public long insert (long xid, byte [] data) throws Exception { lock.lock(); Transaction t = activeTransaction.get(xid); lock.unlock(); if (t.err != null ) { throw t.err; } byte [] raw = Entry.wrapEntryRaw(xid, data); return dm.insert(xid, raw); }
插入数据时,现根据 xid,data 生成 entry 形式的数据,然后调用 dm 模块的接口插入数据
1 2 3 4 5 6 7 8 9 10 11 12 13 14 15 16 17 18 19 20 21 22 23 24 25 26 27 28 29 public byte [] read(long xid, long uid) throws Exception { lock.lock(); Transaction t = activeTransaction.get(xid); lock.unlock(); if (t.err != null ) { throw t.err; } Entry entry = null ; try { entry = super .get(uid); } catch (Exception e) { if (e == Error.NullEntryException) { return null ; } else { throw e; } } try { if (Visibility.isVisible(tm, t, entry)) { return entry.data(); } else { return null ; } } finally { entry.release(); } }
当第一次根据 uid 读取数据时,会先调用 dm 模块的接口根据 uid 读取 dataItem,然后根据这个 dataItem 获取 entry,最后判断这个 entry 对自己是否可见
IM - 索引管理 IM,即 Index Manager,索引管理器,为 MyDB 提供了基于 B+ 树的聚簇索引。目前 MyDB 只支持基于索引查找数据
Node - 节点 Node 类负责处理节点的插入、分裂和查找等操作
1 2 3 4 5 6 7 8 9 static final int IS_LEAF_OFFSET = 0 ;static final int NO_KEYS_OFFSET = IS_LEAF_OFFSET+1 ;static final int SIBLING_OFFSET = NO_KEYS_OFFSET+2 ;static final int NODE_HEADER_SIZE = SIBLING_OFFSET+8 ;static final int BALANCE_NUMBER = 32 ;static final int NODE_SIZE = NODE_HEADER_SIZE + (2 * 8 ) * (BALANCE_NUMBER * 2 + 2 );
Node 的结构
1 2 [LeafFlag][KeyNumber][SiblingUid] [Son0][Key0][Son1][Key1]...[SonN][KeyN]
NODE_SIZE :
BPlusTree - B+树 BPlusTree 类负责管理整个 B+ 树的创建、加载、查找和插入操作
1 2 3 4 5 6 7 8 9 10 11 12 13 14 15 16 17 18 19 20 21 22 23 24 25 26 27 28 29 30 31 32 33 34 35 36 37 38 39 40 41 42 43 44 public void insert (long key, long uid) throws Exception { long rootUid = rootUid(); InsertRes res = insert(rootUid, uid, key); assert res != null ; if (res.newNode != 0 ) { updateRootUid(rootUid, res.newNode, res.newKey); } } private InsertRes insert (long nodeUid, long uid, long key) throws Exception { Node node = Node.loadNode(this , nodeUid); boolean isLeaf = node.isLeaf(); node.release(); InsertRes res = null ; if (isLeaf) { res = insertAndSplit(nodeUid, uid, key); } else { long next = searchNext(nodeUid, key); InsertRes ir = insert(next, uid, key); if (ir.newNode != 0 ) { res = insertAndSplit(nodeUid, ir.newNode, ir.newKey); } else { res = new InsertRes (); } } return res; } private InsertRes insertAndSplit (long nodeUid, long uid, long key) throws Exception { while (true ) { Node node = Node.loadNode(this , nodeUid); InsertAndSplitRes iasr = node.insertAndSplit(uid, key); node.release(); if (iasr.siblingUid != 0 ) { nodeUid = iasr.siblingUid; } else { InsertRes res = new InsertRes (); res.newNode = iasr.newSon; res.newKey = iasr.newKey; return res; } } }
TBM - 字段与表管理 SQL 解析 1 2 3 4 5 6 7 8 9 10 11 12 13 14 15 16 17 18 19 20 21 22 23 24 25 26 27 28 29 30 31 32 33 34 35 36 37 38 39 40 41 42 43 44 45 46 47 48 49 50 51 52 53 54 55 56 57 <begin statement> begin [isolation level (read committedrepeatable read)] begin isolation level read committed <commit statement> commit <abort statement> abort <create statement> create table <table name> <field name> <field type> <field name> <field type> ... <field name> <field type> [(index <field name list>)] create table students id int32, name string, age int32, (index id name) <drop statement> drop table <table name> drop table students <select statement> select (*<field name list>) from <table name> [<where statement>] select * from student where id = 1 select name from student where id > 1 and id < 4 select name, age, id from student where id = 12 <insert statement> insert into <table name> values <value list> insert into student values 5 "Zhang Yuanjia" 22 <delete statement> delete from <table name> <where statement> delete from student where name = "Zhang Yuanjia" <update statement> update <table name> set <field name>=<value> [<where statement>] update student set name = "ZYJ" where id = 5 <where statement> where <field name> (><=) <value> [(andor) <field name> (><=) <value>] where age > 10 or age < 3 <field name> <table name> [a-zA-Z][a-zA-Z0-9_]* <field type> int32 int64 string <value> .*
1 2 3 4 5 6 7 8 9 10 11 12 13 14 15 16 17 public String peek () throws Exception { if (err != null ) { throw err; } if (flushToken) { String token = null ; try { token = next(); } catch (Exception e) { err = e; throw e; } currentToken = token; flushToken = false ; } return currentToken; }
第一次调用 peek() 时,会获取当前下标的关键字存储在 currentToken,然后下标右移,将 flushToken 置为 false,除非调用 pop(),否则下次调用 peek(),获取的关键字还是与上次一样
1 2 3 4 5 6 7 8 9 10 11 12 13 14 15 16 17 18 19 20 21 22 23 24 25 26 27 28 29 30 private String nextMetaState () throws Exception { while (true ) { Byte b = peekByte(); if (b == null ) { return "" ; } if (!isBlank(b)) { break ; } popByte(); } byte b = peekByte(); if (isSymbol(b)) { popByte(); return new String (new byte []{b}); } else if (b == '"' || b == '\'' ) { return nextQuoteState(); } else if (isAlphaBeta(b) || isDigit(b)) { return nextTokenState(); } else { err = Error.InvalidCommandException; throw err; } }
字段与表 Field - 字段 Field 类在数据库系统中用于表示表的字段信息,包含了字段的基本属性(如字段名、字段类型)、索引信息以及对字段值的各种操作方法
1 2 3 4 5 6 7 8 9 10 11 12 long uid; private Table tb; String fieldName; String fieldType; private long index; private BPlusTree bt;
StringLength 是4字节的 int 类型,IndexUid 是 8 字节的 long 类型
1 2 3 4 5 6 7 8 9 10 11 12 13 14 15 16 17 18 19 20 21 22 23 24 25 26 27 28 29 30 31 32 33 34 35 36 37 public static Field loadField (Table tb, long uid) { byte [] raw = null ; try { raw = ((TableManagerImpl)tb.tbm).vm.read(TransactionManagerImpl.SUPER_XID, uid); } catch (Exception e) { Panic.panic(e); } assert raw != null ; return new Field (uid, tb).parseSelf(raw); } private Field parseSelf (byte [] raw) { int position = 0 ; ParseStringRes res = Parser.parseString(raw); fieldName = res.str; position += res.next; res = Parser.parseString(Arrays.copyOfRange(raw, position, raw.length)); fieldType = res.str; position += res.next; this .index = Parser.parseLong(Arrays.copyOfRange(raw, position, position+8 )); if (index != 0 ) { try { bt = BPlusTree.load(index, ((TableManagerImpl)tb.tbm).dm); } catch (Exception e) { Panic.panic(e); } } return this ; } public static ParseStringRes parseString (byte [] raw) { int length = parseInt(Arrays.copyOf(raw, 4 )); String str = new String (Arrays.copyOfRange(raw, 4 , 4 +length)); return new ParseStringRes (str, length+4 ); }
先读取 raw 前 4 个字节,获取字段名的长度,包装成 ParseStringRes 类,并返回,
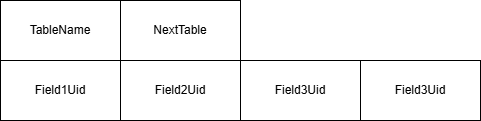
Table - 表 主要负责维护表的结构信息,包括表名、字段信息等,同时处理表的创建、加载、数据的插入、删除、更新和查询等操作
1 2 3 4 5 6 7 8 9 10 TableManager tbm; long uid;String name; byte status;long nextUid;List<Field> fields = new ArrayList <>();
1 2 3 4 5 6 7 8 9 10 11 12 13 14 15 16 17 18 19 20 21 22 23 24 25 26 27 28 public static Table loadTable (TableManager tbm, long uid) { byte [] raw = null ; try { raw = ((TableManagerImpl)tbm).vm.read(TransactionManagerImpl.SUPER_XID, uid); } catch (Exception e) { Panic.panic(e); } assert raw != null ; Table tb = new Table (tbm, uid); return tb.parseSelf(raw); } private Table parseSelf (byte [] raw) { int position = 0 ; ParseStringRes res = Parser.parseString(raw); name = res.str; position += res.next; nextUid = Parser.parseLong(Arrays.copyOfRange(raw, position, position+8 )); position += 8 ; while (position < raw.length) { long uid = Parser.parseLong(Arrays.copyOfRange(raw, position, position+8 )); position += 8 ; fields.add(Field.loadField(this , uid)); } return this ; }
根据 uid 从磁盘读取表的数据,再通过 parseSelf(byte[] raw) 进行解析
解析Where 获取 uids :
1 2 3 4 5 6 7 8 9 10 11 12 13 14 15 16 17 18 19 20 21 22 23 24 25 26 27 28 29 30 31 32 33 34 35 36 37 38 39 40 41 42 43 44 45 46 private List<Long> parseWhere (Where where) throws Exception { long l0=0 , r0=0 , l1=0 , r1=0 ; boolean single = false ; Field fd = null ; if (where == null ) { for (Field field : fields) { if (field.isIndexed()) { fd = field; break ; } } l0 = 0 ; r0 = Long.MAX_VALUE; single = true ; } else { for (Field field : fields) { if (field.fieldName.equals(where.singleExp1.field)) { if (!field.isIndexed()) { throw Error.FieldNotIndexedException; } fd = field; break ; } } if (fd == null ) { throw Error.FieldNotFoundException; } CalWhereRes res = calWhere(fd, where); l0 = res.l0; r0 = res.r0; l1 = res.l1; r1 = res.r1; single = res.single; } List<Long> uids = fd.search(l0, r0); if (!single) { List<Long> tmp = fd.search(l1, r1); uids.addAll(tmp); } return uids; }
updata :
1 2 3 4 5 6 7 8 9 10 11 12 13 14 15 16 17 18 19 20 21 22 23 24 25 26 27 28 29 30 31 32 33 34 35 36 37 38 39 40 41 42 public int update (long xid, Update update) throws Exception { List<Long> uids = parseWhere(update.where); Field fd = null ; for (Field f : fields) { if (f.fieldName.equals(update.fieldName)) { fd = f; break ; } } if (fd == null ) { throw Error.FieldNotFoundException; } Object value = fd.string2Value(update.value); int count = 0 ; for (Long uid : uids) { byte [] raw = ((TableManagerImpl)tbm).vm.read(xid, uid); if (raw == null ) continue ; ((TableManagerImpl)tbm).vm.delete(xid, uid); Map<String, Object> entry = parseEntry(raw); entry.put(fd.fieldName, value); raw = entry2Raw(entry); long uuid = ((TableManagerImpl)tbm).vm.insert(xid, raw); count ++; for (Field field : fields) { if (field.isIndexed()) { field.insert(entry.get(field.fieldName), uuid); } } } return count; }
调用 parseWhere 方法解析更新条件,获取符合条件的数据记录的唯一标识符列表。
TableManager - 对外提供服务 1 2 3 4 5 6 7 8 9 10 VersionManager vm; DataManager dm; private Booter booter;private Map<String, Table> tableCache;private Map<Long, List<Table>> xidTableCache;
创建表 :
1 2 3 4 5 6 7 8 9 10 11 12 13 14 15 16 17 18 19 20 21 22 public byte [] create(long xid, Create create) throws Exception { lock.lock(); try { if (tableCache.containsKey(create.tableName)) { throw Error.DuplicatedTableException; } Table table = Table.createTable(this , firstTableUid(), xid, create); updateFirstTableUid(table.uid); tableCache.put(create.tableName, table); if (!xidTableCache.containsKey(xid)) { xidTableCache.put(xid, new ArrayList <>()); } xidTableCache.get(xid).add(table); return ("create " + create.tableName).getBytes(); } finally { lock.unlock(); } }
其他的方法没什么好说的,都是对 Field、Table 简单封装
总结 我对这个项目最大的感受是抽象做的非常好,每一层都有一个类对外提供接口
https://gitee.com/lbwxxc/my-db
https://shinya.click/projects/mydb/mydb0